Friday, 15 July 2016

Introduction To BizTalk ESB Toolkit 2.2 | ESB BizTalk

This article throws light on core components of BizTalk ESB and its architecture. 

The BizTalk ESB Toolkit provides a stable and powerful platform for services that can change as fast as your business needs them to. The main purpose of an enterprise service bus (ESB) to is to provide a common mediation layer (the “bus”) through which all services connect. By doing so, not only can many of the problems of point-to-point service connectivity be resolved, but a new level of agile service delivery can be achieved. 


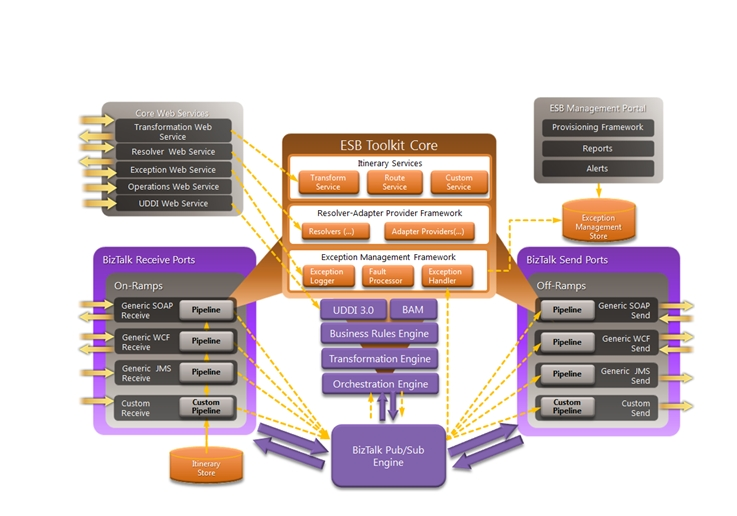
The Microsoft BizTalk ESB Toolkit consists of a series of interoperating components that support and implement a loosely coupled messaging environment that makes it easier to build message-based enterprise applications. 


The services and components fall naturally into the following seven categories: 

Web services. These expose internal services such as itinerary processing, exception management, resolution of endpoints and maps, Microsoft BizTalk Server operations, Universal Description, Discovery, and Integration (UDDI) interoperation, and transformation of message content. 
Itinerary services. These include orchestration-based and messaging-based services for performing transformations and message routing. You can create custom services that participate in Itinerary processing. 
Itinerary on-ramps. These receive external messages, attach the appropriate itinerary for each message, and perform itinerary processing; they use the BizTalk ESB Toolkit Resolver and Adapter Provider Framework for dynamic resolution of endpoints and metadata. 
On-ramps. Unlike itinerary on-ramps, these receive external messages in a range of formats and transports, such as HTTP, Java Message Service (JMS), IBM WebSphere MQ (WMQ), File Transfer Protocol (FTP), Flat File, and XML. They are typical BizTalk Server receive locations that optionally use the BizTalk ESB Toolkit interop pipeline components and the BizTalk ESB Toolkit Resolver and Adapter Provider Framework for dynamic resolution of endpoints and metadata. 
Off-ramps. These implement send ports for the delivery of messages using formats and transports such as WCF, JMS, WMQ, FTP, HTTP, Flat File, XML, or any other custom formats. They are typical BizTalk Server dynamic send ports that are direct-bound to the Message Box and optionally use the BizTalk ESB Toolkit interop pipeline components and the BizTalk ESB Toolkit Resolver and Adapter Provider Framework for dynamic resolution of endpoints and metadata. 
Exception Management Framework. This includes the exception Web service, the exception management API, and components that enrich, process, and pass exception details to the ESB Management Portal. 
ESB Management Portal. This sample application provides registry provisioning, exception  mediation, alert notification, and analytics. 

Many of these components and services rely on features implemented by BizTalk Server, such as the Orchestration, Transformation, and Business Rules engines and the Message Box database.


How ESB Works 


The BizTalk ESB accepts inbound messages and operates on them by performing processes such as transformation, routing, or any other custom defined process. To specify the operations required, the core processing components require each message to have a routing slip that contains associated instructions or metadata that define the processes to apply and the tasks to execute with the message content.These routing slips are referred to as itineraries and can be automatically resolved, retrieved from a central repository, and attached to a message when it is received by an on-ramp. This routing slip approach provides loose coupling between services, meaning that the ESB does not require prior knowledge of the specific processing for each message. It just has to know what the possible range of processes is and how to apply each process. The wide range of options for specifying the available processes and the mapping between the processes and the instructions within messages provides a flexible mechanism for configuring and adjusting behavior, without requiring changes to code and redeployment of components.

Wednesday, 13 July 2016

Boomerang BizTalk Web Service for Transformation


In this article, I would show how to develop a Transformation Web Service in BizTalk with a simple custom pipeline component. This can be extended to leverage other BizTalk features.

Lets create custom pipeline component as shown below, this a simple component which writes the incoming property back to the RouteDirectTo and EPMRRCorrelationToken context properties, which would help us to achieve the echo back service or boomerang service.
Lets create a BizTalk project, add Source and Destination schema then add maps to do simple direct mapping from SourceA To DestinationA and SourceB To DestinationB. Finally, add receive pipeline and have XML Disassembler and our custom boomerang component as shown.
Lets deploy and configure the Application. Here we would just add a simple Two-way receive port and configure the receive location as shown below and configure the maps at the inbound map in the receive port.
Test and verify the process, refer below for execution. As you post the source message, pipeline at dissemble stage context properties are promoted and when it comes to resolver stage, boomerang component rewrites the context properties in such as way, it is subscribed the receive ports send side. Thus the transformed message are echoed back. Similar to boomerang!!  

Executing BizTalk Pipelines Inside Orchestration


In this walk through, I brief about how to execute the pipelines inside orchestration,
add references of Microsoft.XLANGs.Pipeline.dll and Microsoft.BizTalk.Pipeline.dll assemblies. In my earlier article (Custom Pipeline and Pipeline Component), Wrapper Order Request message was debatched in BizTalk Receive Pipeline using Custom Detacher Component. The same detaching logic is implemented inside orchestration.  Below process debatches the received message using SnippetDebatchRP receive pipeline, make orchestration transaction as atomic in case if we are executing receive pipeline.
Below process aggregates the message based on OrderID using correlation and as we are executing send pipeline inside orchestration and the process is of none transaction.

Encryption and Decryption of Sensitive Information using Pipeline Components in BizTalk

In this article, I will brief on encrypting and decrypting the sensitive information using custom pipeline component in BizTalk.

Lets create a class library project to implement Execute pipeline component as shown below, relevant reference are added to develop custom component.
Now, lets define properties to specify the cryption type (encryption or decryption) on data and data node as shown. Cryption Type is defined as enum type as below.
Here is the implementation of  IPersistPropertyBag interface, for CryptionType and Element Properties.
Implementation of IComponent Interface is shown below, based on the CryptionType property and Element Name specify, the data would be encrypted or decrypted.

Internal Encryption and Decryption implementation,
Lets create encryption receive pipeline and bring in EncryptDecrypt Component to Decode stage and define the properties as below.
Similarly, Send Pipeline to Decrypt the information
Deploy the solution and define a receive port and location then associate the EncryptData Receive Pipeline as shown below.
Similarly, define two send ports to subscribe the message received on the receive, 1 send port will have DecryptData Send Pipeline and other would be a simple pass through pipeline.
Pass through Send Pipeline, subscribes the encrypted message.
Process messages and verify the result. 
This mechanism allow us to transfer sensitive information in a is a secured manner and thus 3rd party system would be able to access the information.

Custom Funtiods in BizTalk | Encryption and Decryption in Map


In this article, I will brief about developing a custom function in BizTalk for encrypting and decrypting the sensitive information.  Actually, the right place to encrypt and decrypt sensitive information is at the biztalk pipeline using custom component, which I would cover in later topic.

Create a class library project and add the reference of Microsoft.BizTalk.BaseFunctoids assembly and then derive our functoid from Microsoft.BizTalk.BaseFunctoids.  

In the class construct provide the function name, function bitmaps to be displayed in the mapper, tool tip text, description and a functoid ID as shown. Specify category the functoid belongs to (Math, Logical, String etc..) and set input and output parameters restrictions and connection types. finally, specify the function to call.
Here is the encrpytion and decryption methods, compile the library place the dll in BizTalk Mapper folder then GAC it.
Create a new BizTalk Project, already Source, Internal Canonical and Target Schemas are defined. Let create a BizTalk map and load Source and Canonical  as shown; the sensitive information in the source would be encrypted using custom functiod which we built. In order to add the custom function to Toolbox, right click on it then select  choose items.
Then from the BizTalk Mapper tab; select the custom functiod as shown below.
Now, custom funtiod is available under the category we specified.
Another map Canonical to Target is added, where the information is  decrypt using custom function and passed to target system.
Lets now test the both the maps and verify the results.
Encryption of Data,
 Decryption of Data

Custom Pipelines and Pipeline Components | BizTalk


In this article, I would brief about BizTalk Pipeline and Pipeline Component. 

All messages that flow through BizTalk Server flow through receive and send pipelines. Pipelines have different stages, and each stage can include pipeline components. Pipeline components and pipelines are two completely different entities. You build pipeline components and place them within a BizTalk pipeline. 

By default, Microsoft provides Receive and Send Pipelines 

Receive Pipeline
XMLReceive - Can receive well define XML messages and promotes properties for subscription. 
PassThruReceive - Can receive any type of messages and will not promote any BizTalk Properties 
Send Pipeline
XMLTransmit - Transmit well define XML message to destination. 
PassThruTransmit - Can send any type of message. 

Receive Pipeline has Four Stages 
  • Decode 
  • Disassemble 
  • Validate 
  • Resolve party 
Send Pipeline has Three Stages 
  • Pre-assemble 
  • Assemble 
  • Encode 
To develop a custom component for pipeline we must implement the following interfaces 
  • IBaseComponent 
  • IComponentUI 
  • IComponent 
  • IPersistPropertyBag 
  • IDisassemblerComponent 
IBaseComponent: This describes the Pipeline Component Description Property, used to specify small description about pipeline component. Description is visible on pipeline properties page at design time 

Name 
Property, used to specify name of pipeline component. Name is visible on pipeline properties page at design time. 

Version 
Property used to specify version (example 1.0.0.0) of pipeline component. Visible on pipeline properties page at design time 

IComponentUI: This helps sets the Icon for component 
Icon 
Property used to provide icon associated with pipeline component. 

Validate 
Method, this is called by pipeline designer before pipeline compilation to verify that all configuration properties are correctly set. 

IComponent: Used for specific processing/massaging of messages.

Execute(IPipelineContext pContext, IBaseMessage pInMsg) Method, this does specific processing/massaging in inbound message and produces output message to be forwarded to next stages of pipeline or message box. 

IDisassemblerComponent: Used to split or break incoming message document. 

Disassemble(IPipelineContext pContext, IBaseMessage pInMsg) 
Used to split or break incoming message document. 

GetNext(IPipelineContext pContext) 
Returns messages resulting from the disassemble method execution. 

IPersistPropertyBag: This is used to set pipeline’s design time properties 

GetClassID 
Method, retrieves the component's globally unique identifying value. 

InitNew 
Method,initializes any objects needed by the component to use the persisted properties. 

Load(IPropertyBag propertyBag, int errorLog) 
Method, used to load property from property bag. 

Save(IPropertyBag propertyBag, bool clearDirty, bool saveAllProperties) 
Method,used to save property to property bag. 

Let’s start, we assume order request contains multiple orders in a wrapper and our business process can handle 1 order at a time, hence would require to-split them as individual order request. This can be achieved by just developing a de-batch pipeline component and start receiving the order request with this pipeline component in the receive side. 

To create custom component we use class library, add reference of Microsoft.BizTalk.Pipeline.dll from the directory “C:\Program Files (x86)\Microsoft BizTalk Server 2013\Pipeline Components”. Here we would create a XML Dissembler Component for debatching the message. Implement the required interfaces (IBaseComponent,IComponentUI, IDisassembler)


Actual logical of debatching happens in the IDisassembler interface, as shown below. 
On code complete, compile and the place the dll under the directory “C:\Program Files (x86)\Microsoft BizTalk Server 2013\Pipeline Components". Thus we have created our pipeline component. Create a custom receive pipeline; then choose and load the custom debatch message from Pipeline component directory to Toolbox.
Use the component at the Disassembler Stage of the Receive Pipeline, deploy the application then configure this receive pipeline at the receive location to debatch the message at the receive side in the Admin Console.
Configure the receive location with the custom receive pipeline, start the application and test the solution by copying an XML document with structure defined by the schema inside the input folder and wait the response of the process in the output folders. 


Conclusion:
In this article, I covered the pipeline architecture in BizTalk Server. Now you can customize your own pipeline to apply for your own business scenarios. 

The video demonstration is available on the Youtube, here is the embedded video.

Assembly binding redirect in BizTalk


Scenario/Challenge

As BizTalk middleware integration system, we integrate many systems and should be capable of handling the changes within without bring down the system. 

Small changes like service WSDL or canonical schema update cause full deployment and with each new enabler, multiple full deployments would be hard to manage. Amount of time spent in doing development and complete round trip testing would be huge. Additionally, team should prepare instruction document to handover to SCM. 

Solution 
As BizTalk architecture is based on publish-subscribe model, just versioning assemblies’ wouldn’t help much to overcome this problem.
As message would be defined by MessageType this should be changed along with assembly version. If you need to support long-running orchestrations, side-by-side deployments, or no-downtime upgrades, then you should implement an assembly versioning and packaging strategy.

In order to perform assembly versioning of BizTalk artifacts, your BizTalk solution assemblies need to be factored (packaged) in such a way to allow for BizTalk Server versioning. 

There are 4 types of factoring: 
  • No factoring:- All BizTalk artifacts are in one assembly. This is the easiest to understand and deploy, but provides the least amount of flexibility. 
  • Full factoring:- Each BizTalk artifact is in its own assembly. This provides the most flexibility, but is the most complex to deploy and understand.
  • Optimal factoring:- Somewhere in-between “no factoring” and “full factoring” based on in-depth analysis of your BizTalk applications. In addition to versioning, this allows you to easily implement your BizTalk Host design. This is achieved by looking for relationships among BizTalk artifacts. Artifacts that are always version-ed together can typically be put in the same assembly. If independent versioning of the artifacts is required, then they must be put in different assemblies. This is the level of factoring you want to achieve. 
  • Assembly binding re-directs:-If there are changes in common artifacts like call orchestrations and common schema increment the version for these artifacts and deploy it to admin console. Assemblies referring to old version of common artifacts and in order to make them use of the latest artifacts in from assembly we should make an entry in btsconfig file (available in installation path; i.e C:\Program Files (x86)\Microsoft BizTalk Server 2013) for the updated common artifacts as shown below, thus whenever old assembly is loaded binding redirect will happen and latest assembly would be used for process. 


Tuesday, 12 July 2016

Exposing Schema As Web Service


In this article, I brief about creating a BizTalk Web Service by exposing schema as WCF Service and then build workflow to perform CRUD operations on entity.

Let’s create a BizTalk project and add a new simple Request and Response schema as shown; this schema would be exposed as web service. Here, I have promoted (custom property) operation as message data context property. CRUD operation happen using this message data context property.

Let us build the orchestration to perform the CRUD operation on the Techie Entity. Bring in a Listen Shape and then create logical two-way request response port and add operations (POST, GET, GETBY and PUT) as shown.

For our ease, we would build 3 flows for Post, Get and GetBy. 


We would receive the InfoReq and respond back to the client with InfoRes and just to keep it simple most of the Entity related manipulation would happen thru helper class; this would interact with DB to perform CRUD operation.

Here is our DBHelper class, which uses ADO.net namespaces.

At high-level, on receiving a message; specific flow would triggered based on the operation type (message data context property) and corresponding DB operations are performed thru DBHelper class. Eventually InfoRes is constructed and echoed back to client.

Now, let’s publish the schema as WCF-Service with Custom-Isolated Transport type and opt to create the receive port which would bound to orchestration. Test and verify the flow.

We can convert the web service to restful service just by choosing WCF-Service with WCF-WebHttp Transport type, I made few change over here in the orchestration, instead of using message data context property (Operation) in Receive filters, I used BTS.Operation. To support rest capabilities, I add new context properties such as ID,TechieName etc and renamed the Operation names to be more meaningful. I created and any type msg and mapped to the receive shapes on the Get flows, as we would be suppressing the body of the message in case of HTTP GET verb operation.

Go to Admin Console, add BTS Action URLS and map the URL Param variables to corresponding context properties and set GET operation to suppress the message body.

Now let’s test and verify the behaviour.

BAM Tracking End to End in BizTalk


This article will show how to implement E2E BAM Tracking by enabling Continuation between Receive, Orchestration and Send Ports.

BAM
Information workers need flexibility in looking at and evaluating business processes. A purchasing manager might need to see how many POs are approved and denied each day, for example, while a sales manager might want an hourly update on what products are being ordered. Meeting these diverse needs requires a general framework for tracking what’s going on with a particular business process. This is exactly what the Business Activity Monitoring (BAM) component in Microsoft BizTalk Server provides

BAM is used to monitor business milestones and key metrics in near real-time throughout a process in BizTalk. BAM is tied directly to the central BizTalk engine (that is, processes and databases) through OLAP cubes. These cubes are created automatically when a developer deploys a BAM report and profile, typically by using a combination of Microsoft Excel pivot tables and the BizTalk Tracking Profile Editor.

BAM Activities 
BAM activities identify the milestones and tracking data an individual is interested in tracking. Milestones are the steps in an activity that are measured in time, and tracking data is the key data points in a process you are interested in tracking (such as a customer ID or name).

BAM View
A BAM view is a representation of the milestones and business data tracked in one or more activities.

The Group milestone allows related milestones to be treated as a single milestone. For example, grouping the EndSuccess and Exception milestones is useful to indicate the completion of the process regardless of whether it completed successfully or failed. Duration calculates the time between two business milestones and is useful when reporting the time elapsed between two milestones is important. A progress dimension defines milestones and stages for a process. A progress dimension allows you to display how many processes are at an existing status at a given time. For example, a progress dimension will display how many processes are in the middle of execution, how many encountered an exception, or how many processed without an exception. Alias allows the referencing of a previously created milestone

BAM Alerts
BAM alerts allow you to configure and receive alerts related to specific changes in business data. Alerts are set up per BAM view.

BAM is based on SQL Server Reporting Services, and events are fundamentally triggered via SQL Server Notification Services.

Lets create an activity, Open Excel > Add-Ins>BAM>Activity and add RequestedDateTime, OrderTranscationID, RequestorType, OrderID, ValidationStartTime, ValidationEndTime and OrderReferenceNum as Business Data Items as shown below and complete the activity. 

Deploy the Activity using the command  bm.exe deploy-all -DefinitionFile:”BizTalkDJBAMView.xml”
Once the activity is deployed, tracking activity related tables are created in BAMPrimaryImport Database.

Tracking At Receive Port
Open Tracking Profile Editor and open the activity you just deployed. From the Event Source, select Messaging Properties Schema and Mapping the Port Start Time to RequestDateTime Activity Item. Then click on PortStartTime and Choose SetPortMapping and choose the desired Receive Port.

Now from the Event Source, select Messaging Payload and select the source schema deployed then map the TransID from schema to OrderTransID in Activity and set the port mapping similar to previous step.
Tracking At Orchestration
To track messages inside the orchestration, choose Orchestration Schedule from the Event Source and map the Receive to ValidationStartTime and Decide shape to ValidationStartTime.

In order to track any data available from the message payload or context on a specific shape, right click on the shape and choose the relevant schema and map the data to activity item.

Now Apply Tracking from Tools menu, once its deployed test the application by dropping a file. Open BAM Portal. Instead of seeing a single record in the BAM, you will see two records. One Contributed by the receive port and the other from orchestration. Ideally both should contribute to the same record.

Enable Continuation
To resolve this, continuation should be enabled between the port and process. Come back to tracking profile editor. 

Right Click the BAMActivity Node and Select New Continuation and name it as TransactionID then map the message payload TransID to this Item and set the Port. 
Again add New ContinuationID and name is TransactionID then map the TransID from Message Payload from Receive Shape on the orchestration.

You are done. Go to Tools -> Apply Tracking Profile. Test again by dropping another file. This time, you see that only one record comes for both the Receive Port and orchestration process.
 Tracking profile can be deployed using bttdeploy.exe as shown below,
Conclusion
In this article, I covered how to do E2E tracking by using continuation, now you can apply this solution to your own business scenario.

The video demonstration is available on the Youtube, here is the embedded video.

Custom Context Property Schema and Property Promotion using Correlation


In this article, I would Develop custom context properties and initialize correlation to promote properties to context and subscribe the messages based on the context values.

Lets create a Biztalk project and add new property schema then add property elements as shown below. Deploy the project to Admin Console and then create a send port and in Filters tab choose the custom property element as shown.

Now, create another BizTalk project with an orchestration and a schema,this process receives a message from a file receive port and creates a copy of the same message with updated context information which would be used for subscription by  send port acting as a subscriber.Finally updated copy of message is sent to destination. Add the reference of the context property schema project.
Create a correlation type and correlation set on the custom property element in the orchestration view and initialize the correlation set in the send shape as shown below.
Deploy this solution and test.

The video demonstration is available on the Youtube, here is the embedded video.